How to brown meat in a slow cooker?
Here’s the honest truth about slow cookers: they are not designed to brown meat. The moist, sealed environment that makes them great for low-and-slow cooking is exactly what prevents the high-heat, dry conditions needed for browning. But that does not mean you are stuck with pale, steamed-looking meat. With the right techniques, you can get deeply flavored, properly browned — even crispy — results from your slow cooker setup. This guide covers every method, when to use each one, and why they work.
Why Slow Cookers Don’t Brown Meat on Their Own
Browning happens through a chemical process called the Maillard reaction — a reaction between proteins and sugars on the surface of meat when exposed to temperatures above 280°F (138°C). Slow cookers typically operate between 170°F and 280°F on low, and 200°F to 300°F on high. Even at their hottest, the moist environment inside the cooker keeps surface temperatures too low and too wet for true browning to occur.
Condensation drips back onto the meat continuously. The lid traps steam. Fat renders and pools. All of this is ideal for breaking down tough connective tissue — but it actively works against surface browning and crust formation.
Understanding this is the foundation of every technique below.
Method 1: Pre-Sear in a Skillet (The Gold Standard)
Pre-searing is the most reliable method and the one used by professional cooks. Before anything goes into the slow cooker, you sear the meat in a hot skillet to develop color, crust, and flavor.
How to do it:
- Pat the meat completely dry with paper towels. Moisture is the enemy of browning.
- Season generously with salt and pepper.
- Heat a cast iron or stainless steel skillet over high heat until smoking.
- Add a high smoke-point oil (avocado, grapeseed, or refined vegetable oil).
- Sear each side for 2–3 minutes without moving the meat. Resist the urge to flip early.
- Sear all sides, including edges on roasts.
- Deglaze the pan with a splash of broth or wine, scraping up the fond (browned bits).
- Pour the deglazing liquid into the slow cooker along with the meat.
Why it works: The dry, high heat of the skillet triggers the Maillard reaction that the slow cooker cannot achieve. The fond adds a layer of deep, savory flavor to the entire dish.
Key tip — brown in batches: Overcrowding the pan drops the temperature and causes the meat to steam instead of sear. Leave space between pieces. For 2 lbs of beef chunks, this typically means two or three separate batches.
Method 2: Broil After Cooking
For shredded meats, whole cuts, and poultry, finishing under the broiler after slow cooking is one of the most effective ways to achieve color and crispiness. This is the go-to method for carnitas, pulled pork, and slow-cooked chicken thighs.
How to do it:
- Remove the cooked meat from the slow cooker.
- For shredded meat: spread in a single layer on a foil-lined baking sheet. Spoon a few tablespoons of cooking liquid over the top.
- For whole cuts or poultry: place skin-side up on a rack over a baking sheet.
- Broil on high (500°F / 260°C) for 5–10 minutes, watching closely to avoid burning.
- For shredded pork or beef, toss once halfway through to crisp multiple surfaces.
Why it works: The broiler provides the intense dry heat the slow cooker cannot. The sugars in the cooking liquid caramelize on the meat’s surface rapidly, creating the browned, slightly crispy texture associated with oven-roasted or grilled meat.
This method is especially effective for carnitas-style pork, where you want crispy edges while keeping the interior moist and tender.
Method 3: The Paper Towel Trick (Moisture Control)
If you want to reduce sogginess during the slow cooking process itself — particularly for poultry where you want the skin to have a fighting chance — the paper towel method is simple and effective.
How to do it:
- Place a double layer of paper towels between the slow cooker insert and the lid.
- The paper towels absorb condensation that would otherwise drip back onto the meat.
- Replace if they become fully saturated during a very long cook.
Why it works: One of the biggest obstacles to browning in a slow cooker is continuous re-moistening from condensation. By absorbing this drip, the paper towels allow the surface of the meat — especially the top, which is above the liquid line — to dry out slightly, which makes subsequent broiling or oven finishing far more effective.
This trick works best in combination with Methods 1 or 2, not as a standalone browning solution.
Method 4: Skip the Added Liquid
One of the most underused techniques for getting better color and texture from slow cooker meat is simply not adding extra liquid.
Most meats — especially fattier cuts like pork shoulder, chicken thighs, and beef chuck — release a significant amount of their own liquid during cooking. If you add broth, water, or sauce on top of that, you end up with meat that is fully submerged and steaming throughout the entire cook time.
The no-liquid method:
- Use fattier, bone-in cuts that self-baste as they cook.
- Season the meat and place it directly in the slow cooker — no added liquid.
- Cook on low. The fat renders slowly and the meat essentially braises in its own juices.
- The portions of the meat above the liquid line will develop a drier, more caramelized surface.
- Finish under the broiler for full effect.
This is the approach behind some of the crispiest slow cooker results — including rotisserie-style chicken and Hawaiian-style pork — where the top of the meat emerges with visible browning and a drier texture, while the interior stays completely tender.
Method 5: Use a Slow Cooker with a Sear/Sauté Function
Several modern multi-cooker models include a dedicated browning or sauté function that heats the insert directly to high temperatures, eliminating the need for a separate skillet. This is the most convenient all-in-one approach.
Models with browning capability include:
| Model | Browning Function | Capacity | Approx. Price (USD) |
|---|---|---|---|
| Cuisinart MSC-600 | Sauté/Brown | 6 qt | $100–$130 |
| Ninja MC1001 Foodi | Sear/Sauté | 6.5 qt | $130–$160 |
| All-Clad SD700450 | Brown/Sauté | 7 qt | $200–$250 |
| Instant Pot Duo | Sauté (not slow cooker mode) | 6 qt | $80–$100 |
| Crock-Pot SCCPVL610-S | Stovetop-Safe Insert | 6 qt | $60–$80 |
How to use the sauté function:
- Select the Sear or Sauté setting and preheat.
- Add oil and sear the meat in the same insert.
- Switch directly to Slow Cook mode without transferring the meat.
- The browned fond remains in the pot, enriching the entire dish.
The advantage here is convenience and fewer dishes. The limitation is that insert size may reduce the space available for browning, so batch searing is still often necessary.
Method 6: Dredge in Flour Before Searing
Lightly coating meat in flour before searing does two things: it accelerates browning (the flour browns faster than meat proteins alone) and it helps thicken the cooking liquid as the dish simmers.
How to do it:
- Pat meat dry.
- Toss lightly in all-purpose flour, shaking off any excess.
- Sear in a hot skillet as described in Method 1.
- Add directly to the slow cooker.
This technique works particularly well for beef stews and braises where a thicker, richer sauce is the goal. The flour acts as a built-in thickener throughout the long cook time.
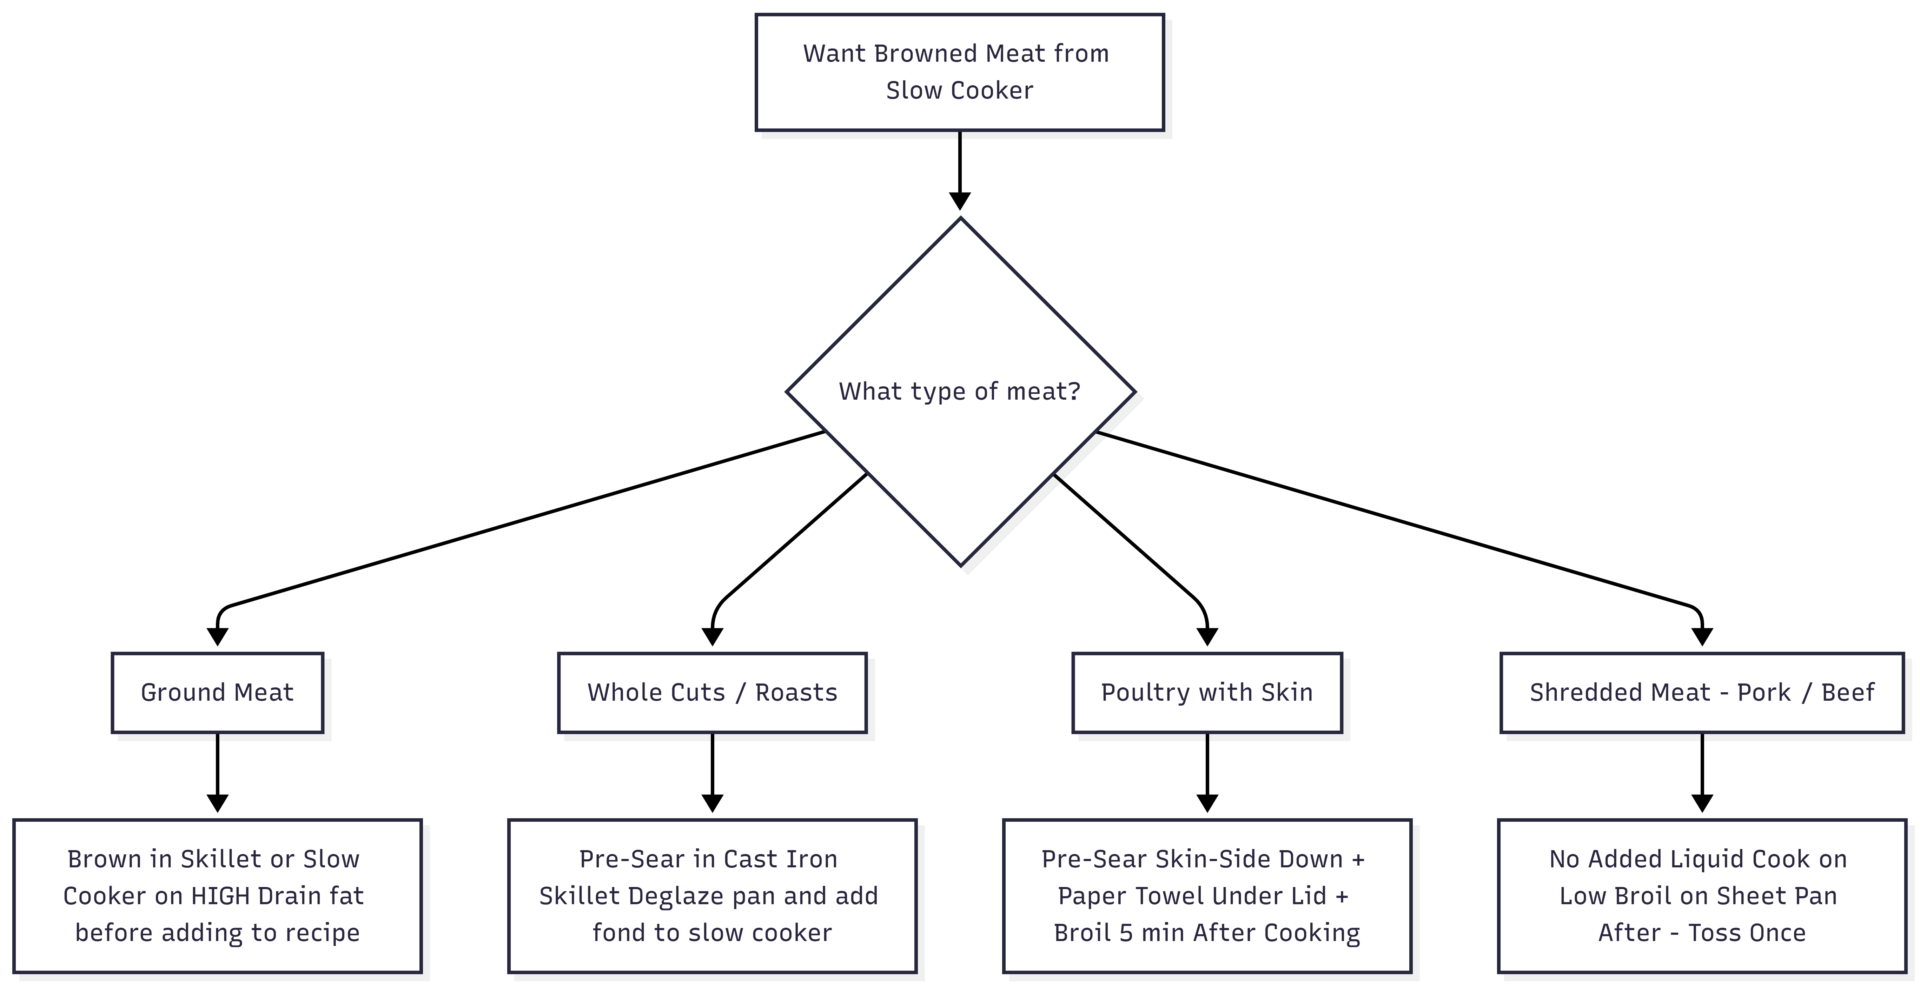
Browning Techniques at a Glance
Browning Ground Meat in a Slow Cooker (No Skillet Method)
If you are browning a large batch of ground beef for meal prep and want to skip the stovetop entirely, you can cook it directly in the slow cooker — though the result is more like fully cooked crumbled meat than traditionally browned beef.
Steps:
- Break the raw ground meat into chunks and place in the slow cooker insert.
- Cook on HIGH, stirring and breaking apart every 30 minutes.
- Timing: approximately 2 hours for 1 lb in a 4-quart cooker; 4 hours for 5 lbs in a 6-quart cooker.
- Drain excess fat carefully — pour into an old container and discard in the trash, not down the drain.
- Season after draining.
This method is best used for meal prep where the meat will be used in tacos, pasta sauce, or casseroles — situations where the meat is combined with other flavors and a deep sear crust is not essential.
Browning Agents: Sauces That Add Color
When full pre-searing is not possible, certain liquid seasonings applied to the meat’s surface before or during cooking can deepen color and add the appearance and partial flavor of browning.
| Browning Agent | Effect | Best Used On |
|---|---|---|
| Worcestershire Sauce | Dark color, umami depth | Beef, lamb |
| Soy Sauce (dark) | Deep mahogany color | Pork, beef, poultry |
| Kitchen Bouquet | Pure color enhancement | Any protein |
| Balsamic Vinegar | Color + slight sweetness | Pork, chicken |
| Liquid Smoke | Smoky flavor, minor color | Pork, beef |
These are not substitutes for searing — they do not develop the same complex Maillard flavors — but they significantly improve the visual result, especially for poultry where pale skin is unappealing.
Seasoning Timing: Early vs. Late
Browning and seasoning are closely linked. When you season, and what you add, affects both flavor development and surface browning.
Season early (before or during searing):
- Salt draws moisture to the surface initially, then gets reabsorbed, seasoning the meat deeply.
- Dry rubs applied before searing contribute to crust formation.
- Garlic powder and onion powder added to a flour dredge accelerate browning.
Season late (last 30–60 minutes of slow cooking):
- Fresh herbs (parsley, cilantro, basil) should always be added at the end — extended heat destroys their volatile aromatic compounds.
- Acidic ingredients (lemon juice, vinegar) added too early dull color and can toughen proteins.
- Dairy-based sauces must always be added in the final 15–30 minutes.
Herbs vs. Spices — Timing Comparison:
| Ingredient | Add Early | Add Late | Notes |
|---|---|---|---|
| Dried thyme, rosemary, oregano | ✓ | Withstand long cooking well | |
| Fresh basil, parsley, cilantro | ✓ | Lose flavor and color quickly | |
| Ground cumin, smoked paprika | ✓ | Bloom in fat during searing | |
| Whole spices (star anise, bay) | ✓ | Remove before serving | |
| Garlic (minced) | ✓ (sauté first) | Raw garlic can turn bitter | |
| Garlic (whole cloves) | ✓ | Mellows into sweetness over time | |
| Fresh ginger | ✓ | Loses brightness with long heat | |
| Lemon zest | ✓ | Turns bitter with long cooking |
Flavor Layering in Slow Cooker Meat Dishes
Getting maximum flavor from slow cooker meat is not just about browning — it is about building layers at different stages.
Stage 1 — Sear (if applicable): Develop Maillard flavors in the skillet. Add dry spices to the hot fat and let them bloom for 30 seconds before searing. Deglaze the pan and capture every bit of flavor.
Stage 2 — Build the base: Layer aromatics (onions, carrots, celery) at the bottom of the slow cooker. Place seared meat on top. Add any liquid — broth, wine, tomatoes — to the sides, not over the top of the meat, to keep the surface drier.
Stage 3 — Mid-cook additions: Add vegetables that cook quickly (bell peppers, zucchini, mushrooms) in the last 1–2 hours to prevent them from going mushy.
Stage 4 — Finish: Add fresh herbs, dairy, citrus, or fresh aromatics in the final 15–30 minutes. Taste and adjust salt. If finishing under the broiler, do so before the final seasoning adjustment.
Common Mistakes That Prevent Browning
- Adding too much liquid: Fills the cooker with steam and prevents any surface drying.
- Skipping the pat-dry step: Wet meat steams instead of searing, even in a hot pan.
- Overcrowding the searing pan: Temperature drops and the meat releases moisture.
- Lifting the lid repeatedly: Releases heat and prolongs cook time without browning benefit.
- Expecting the slow cooker to do the browning work alone: It cannot — use it in combination with a skillet or broiler.
Final Takeaway
A slow cooker excels at low, moist, long cooking — but with the right approach, you do not have to sacrifice browned, flavorful, visually appealing meat. Pre-sear in a hot skillet before the slow cooker, broil after cooking for crispiness, control moisture with the paper towel trick, and skip unnecessary liquid for fattier cuts. Use a multi-cooker with a built-in sauté function to streamline the process. Season in layers — spices early, fresh herbs and acid at the end. Every technique here can be used independently or combined, and each one addresses a specific limitation of the slow cooker environment. The result is slow-cooked tenderness with the color and depth of flavor that actually makes meat worth eating.
Please share this How to brown meat in a slow cooker? with your friends and do a comment below about your feedback.
We will meet you on next article.
Until you can read, Why are my slow cooked meals tasting bland?