How to prevent dairy separation in slow cooker recipes?
There is a particular frustration that slow cooker cooks know well: lifting the lid after eight hours of anticipation only to find a grainy, curdled mess floating in a watery pool where a silky cream sauce should be. Dairy separation in the slow cooker is one of the most common — and most avoidable — mistakes in slow cooking. The good news is that once you understand why it happens, you can prevent it reliably every time, using the right dairy, the right timing, and the right technique.
This guide covers everything from the food science behind curdling to advanced flavor-layering strategies, early vs. late seasoning, and the art of herbs and spices timing — so you can build restaurant-quality depth of flavor without sacrificing texture.
Why Dairy Separates in a Slow Cooker
Milk, cream, yogurt, and cheese are all emulsions — complex mixtures of water, fat, and protein held together in a delicate balance. Standard slow cookers operate at temperatures between 170°F (77°C) on Low and 212°F (100°C) on High, sustained for hours. At those temperatures and over that duration, proteins denature and coagulate, fat globules separate from the water phase, and what was once a smooth, creamy emulsion becomes broken and grainy.
Salt and acids — both essential for good flavor — accelerate this process. Salt disrupts the charge on protein molecules, making them cluster. Acidic ingredients like tomatoes, wine, lemon juice, or vinegar do the same. Since a flavorful slow cooker dish almost always contains both, dairy added at the start of cooking faces a triple threat: prolonged heat, salt, and acid — all working to break the emulsion.
Understanding this isn’t just academic. It directly dictates the strategy for every creamy slow cooker dish you’ll ever make.
The Core Rule: Timing Is Everything
The single most important principle for preventing dairy separation in the slow cooker is this: add dairy at the end of the cook time, not the beginning.
For most slow cooker recipes, this means stirring in cream, milk, sour cream, yogurt, or cheese during the last 15 to 30 minutes of cooking — with the heat set to Low. This window is enough time for the dairy to warm through and integrate with the rest of the dish, but not long enough to push proteins past the curdling threshold.
| Dairy Type | Recommended Add Time Before Serving | Heat Setting |
|---|---|---|
| Heavy cream / double cream | 15–20 minutes | Low |
| Sour cream | 10–15 minutes | Low or Off |
| Full-fat yogurt | 10–15 minutes | Low or Off |
| Shredded hard cheese | 10 minutes | Low |
| Soft/cream cheese | 15–20 minutes | Low |
| Whole milk | 20–30 minutes | Low |
| Evaporated milk | 30 minutes | Low |
| Half-and-half | 20–25 minutes | Low |
The principle is simple but the temptation to “dump and go” is real. Resist it. The payoff is a silky, cohesive sauce versus a grainy, broken one.
Choosing the Right Dairy: Fat Content Is Your Best Ally
Fat is a stabilizer. The higher the fat content in your dairy, the more resistant it is to breaking under heat. This is not a coincidence — fat physically coats and cushions protein molecules, making it harder for them to clump together when heat is applied.
Dairy Fat Content Comparison
Fat Content by Dairy Type
──────────────────────────────────────────────────────
Heavy cream / double cream    │████████████████████ 36–48%
Whipping cream                │████████████████     30–36%
Full-fat sour cream           │████████████         18–20%
Cream cheese                  │████████████████     33%
Full-fat yogurt               │████                 3–10%
Whole milk                    │███                  3.5%
Half-and-half                 │████                 10–18%
Evaporated milk               │████                 7–8%
Skim milk / low-fat milk      │█                    0–1%
──────────────────────────────────────────────────────
Heavy cream and double cream are the gold standard for slow cooker applications. Their fat content is high enough that they resist curdling even when added slightly earlier than other dairy types, and they produce a noticeably richer finished dish.
Cream cheese is another excellent choice. It is very stable under heat, melts smoothly, and adds body and richness to sauces and soups. Cut it into small cubes before adding for faster melting.
Full-fat sour cream and yogurt work well, but require the tempering method described below — they are protein-dense and will seize if added cold to a very hot liquid.
Evaporated milk is more heat-stable than fresh milk because the canning process has already concentrated and partially denatured its proteins. It is a useful pantry substitute, but it still benefits from late addition.
Skim milk and low-fat dairy are the highest risk. They lack the protective fat layer and will curdle more readily. Avoid them in slow cooker recipes unless you are using a stabilizing starch simultaneously.
The Tempering Method: The Professional’s Technique
Tempering is the technique chefs use to gradually raise the temperature of a cold or room-temperature ingredient before incorporating it into something hot. It prevents thermal shock — the sudden jump in temperature that causes proteins to seize immediately.
How to temper dairy for the slow cooker:
- Remove 2–3 tablespoons of the hot cooking liquid from the slow cooker using a ladle.
- Add this hot liquid slowly to your cold dairy (sour cream, yogurt, cream cheese) while stirring constantly.
- Repeat with a second ladleful, continuing to stir.
- Once the dairy mixture has warmed to approximately the same temperature as the slow cooker liquid, stir the entire dairy mixture back into the slow cooker.
- Stir well to combine, set to Low, and serve within 15 minutes.
This method is especially important for yogurt and sour cream. Both contain high levels of whey protein that are sensitive to sudden temperature changes. Tempering brings them up to temperature gradually, preventing the proteins from tightening and separating before they’ve had a chance to integrate into the sauce.
Using Starch as a Stabilizer
Starch is a chemical buffer for dairy. When dispersed in liquid and heated, starch granules absorb water and swell, forming a gel-like network that physically prevents protein molecules from clumping together. This is why béchamel sauce — made with a flour-butter roux — is far more stable than plain cream in cooked applications.
Two methods to stabilize dairy with starch:
Method 1: Mix Starch Directly into Cold Dairy
Before adding dairy to the slow cooker, whisk 1 teaspoon of cornstarch or flour per cup of dairy directly into the cold dairy. The starch disperses evenly while cold and integrates smoothly when the mixture hits heat.
Method 2: Make a Slurry Separately
Whisk 1–2 tablespoons of cornstarch with 2–3 tablespoons of cold water until smooth. Stir this slurry into the slow cooker about 30 minutes before serving, then add your dairy. The sauce will thicken and create a stable base for the dairy to integrate into.
Never add starch to hot liquid without first dissolving it in cold liquid. Raw starch clumps immediately in heat, creating lumps rather than a smooth thickener.
| Stabilizer | Amount Per Cup of Dairy | Best For |
|---|---|---|
| Cornstarch | 1 tsp | Soups, light cream sauces |
| All-purpose flour | 1 tsp | Hearty stews, gravies |
| Arrowroot | ¾ tsp | Clear sauces, delicate flavors |
| Cream cheese | 2 tbsp | Rich soups, pasta-style sauces |
Early vs. Late Seasoning: Building Flavor Without Breaking Dairy
One of the most overlooked strategies in slow cooker cooking is the timing of seasoning. Getting this right does two things simultaneously: it prevents dairy curdling and it produces dramatically better flavor.
Early Seasoning: What to Add at the Start
Aromatic base ingredients — onions, garlic, celery, carrots — benefit from the full duration of slow cooking. They soften completely and release their sugars and aromatics into the braising liquid over hours. Add these at the beginning without hesitation.
Spices that need time to bloom — smoked paprika, cumin, coriander, turmeric, chili powder — also belong at the start. Fat-soluble flavor compounds in these spices need prolonged heat to fully develop and infuse the cooking liquid. Adding them early produces a dish with deep, integrated spice flavor rather than a raw, sharp, surface-level spice note.
Dried herbs with woody stems — rosemary, thyme, bay leaves, sage, dried oregano — go in at the start. These herbs are robust enough to withstand hours of heat and release their oils slowly, building background complexity.
Salt deserves special consideration. Add a conservative amount of salt at the beginning — roughly half your intended final quantity. As liquid reduces and concentrates during cooking, salt levels intensify. Over-salting early also accelerates dairy curdling if any dairy happens to come into contact with the hot liquid before it has fully emulsified.
Late Seasoning: What to Add at the End
Fresh, delicate herbs — parsley, basil, chives, tarragon, dill, cilantro — lose all their volatile aromatic compounds within minutes of heat exposure. Add them in the final 5 minutes, or better yet, as a garnish at the table.
Acid — lemon juice, vinegar, a splash of white wine — should be added after the dairy is fully incorporated and the dish is off heat. Acid brightens flavor and lifts heavy slow-cooked dishes but will actively curdle dairy if introduced while the heat is still on. A squeeze of lemon at the end is transformative; a cup of tomatoes added with the cream is a recipe for disaster.
Final salt adjustment also happens at the end. Taste after adding dairy and adjust carefully — dairy itself contains salt and will slightly raise the overall seasoning level.
Early vs. Late Seasoning Reference
─────────────────────────────────────────────────────────────────
ADD AT THE START                    ADD AT THE END
─────────────────────────────────────────────────────────────────
Onions, garlic, shallots            Fresh parsley, basil, chives
Dried woody herbs (thyme,           Fresh dill, tarragon, cilantro
  rosemary, bay, sage)
Ground spices (cumin, paprika,      Lemon juice / vinegar (acid)
  turmeric, coriander)
Half of intended salt               Final salt adjustment
Tomato paste (not fresh tomato)     All dairy (cream, milk, yogurt,
Worchestershire / soy sauce           sour cream, cheese)
Stock, wine (for braising)          Finishing oils (truffle, chili)
─────────────────────────────────────────────────────────────────
Herbs vs. Spices Timing: A Deeper Look
The distinction between herbs and spices matters more in slow cooking than in any other cooking method, because the sustained heat environment amplifies the differences in how each type of flavoring behaves.
Spices are derived from seeds, bark, roots, and dried fruits. Their active flavor compounds are largely fat-soluble and heat-stable, meaning they need heat and time to fully release. Blooming spices in the slow cooker — ideally in fat (butter or oil) on the stovetop before adding them, or simply adding them at the start of the cook — develops fuller, more rounded spice flavor. Spices added late can taste raw, sharp, or dusty.
Herbs are derived from the green, leafy parts of plants. Their flavor compounds are water-soluble and highly volatile — they evaporate quickly with heat. Fresh herbs added at the start of an 8-hour cook will contribute almost nothing to the final dish. Dried herbs are more concentrated and heat-stable than fresh, but even they begin to lose potency after 4–5 hours of sustained heat.
Herb and Spice Timing Guide
| Ingredient | Category | Add When | Why |
|---|---|---|---|
| Smoked paprika | Spice | Start | Needs heat to bloom, fat-soluble |
| Cumin | Spice | Start | Earthy compounds develop with time |
| Turmeric | Spice | Start | Color and flavor need sustained heat |
| Chili flakes | Spice | Start | Heat extracts capsaicin over time |
| Cinnamon (for savory) | Spice | Start | Needs long cook to mellow |
| Dried thyme | Herb (dried) | Start | Robust enough for long cook |
| Dried rosemary | Herb (dried) | Start | Woody, heat-stable |
| Bay leaves | Herb (dried) | Start | Slow-release aromatics |
| Dried oregano | Herb (dried) | Start (or middle) | Can turn bitter if cooked too long |
| Dried basil | Herb (dried) | Middle (last 2 hrs) | More delicate than other dried herbs |
| Fresh rosemary | Herb (fresh) | Last 30 minutes | Volatile oils evaporate with heat |
| Fresh thyme | Herb (fresh) | Last 30 minutes | Use as late garnish when possible |
| Fresh basil | Herb (fresh) | Garnish only | Wilts and loses flavor instantly |
| Fresh parsley | Herb (fresh) | Garnish only | Heat destroys bright, fresh flavor |
| Fresh dill | Herb (fresh) | Garnish only | Extremely volatile |
| Fresh cilantro | Herb (fresh) | Garnish only | Becomes bitter with prolonged heat |
The practical takeaway: use dried herbs for the body of flavor during cooking, and reserve fresh herbs entirely for finishing and presentation. This is how professional kitchens approach braised and slow-cooked dishes, and it produces measurably better results.
Flavor Layering in the Slow Cooker
Flavor layering is the deliberate practice of adding ingredients in a sequence that builds complexity — each addition contributing something the others cannot. In slow cooker cooking, layering is especially important because the single cooking environment limits the number of reactions (browning, caramelization, reduction) that happen naturally on the stovetop.
The Slow Cooker Flavor Layer Framework
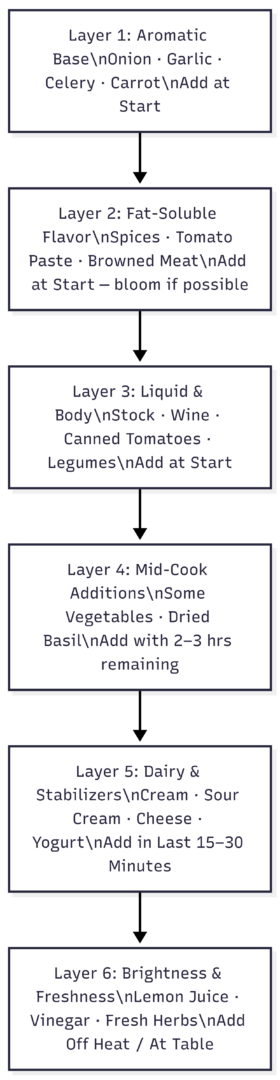
Layer 1 — The Aromatic Base
Every great slow cooker dish begins with aromatics. Onions, garlic, celery, and carrots (the classic mirepoix) form the flavor foundation. In an ideal world, you sauté them in butter or oil on the stovetop first, developing caramelized depth. If you’re committed to dump-and-go, add them raw — they’ll still soften and flavor the liquid, just without the caramelized complexity.
Layer 2 — Fat-Soluble Flavors
Spices, tomato paste, and browned meat are all in this layer. Each contributes fat-soluble flavor compounds that need heat and time to fully extract. If you can sear your meat before slow cooking, do it — the Maillard reaction creates hundreds of new flavor compounds unavailable from slow-cooked meat alone. Tomato paste, added at the start, caramelizes slightly and contributes umami and body.
Layer 3 — Liquid and Structural Ingredients
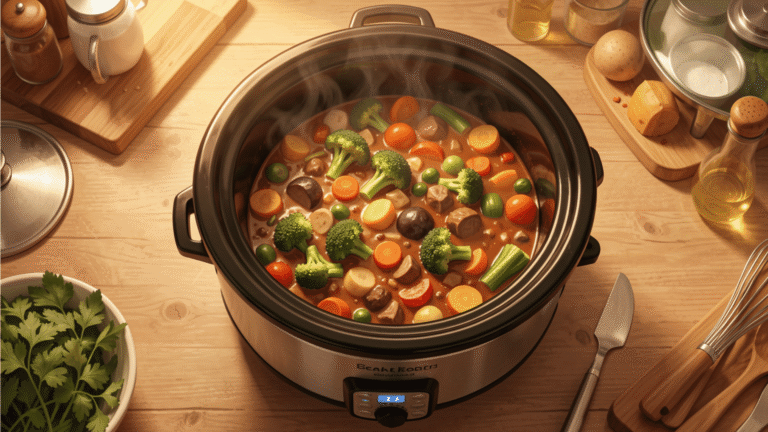
Stock, wine, canned tomatoes, beans, lentils, and root vegetables go in here. These form the body of the dish and undergo the long extraction process that slow cooking excels at. The liquid is also the medium into which all other flavors will eventually integrate.
Layer 4 — Mid-Cook Additions
More delicate vegetables — zucchini, corn, peppers, snap peas — added at the start of an 8-hour cook become mush. Add them with 2–3 hours remaining on Low, or 1–2 hours on High. Pasta and grains should also be added late; they absorb liquid rapidly and become overcooked quickly.
Layer 5 — Dairy (The Critical Layer)
This is where the principles of this entire guide converge. After 6–8 hours of slow cooking, your aromatic base, spices, and structural ingredients have developed full flavor. The dish is nearly done. Now — and only now — is the time to add dairy. Following the timing guidelines in the earlier section, add your cream, sour cream, yogurt, or cheese, using the tempering method for protein-dense options, and starch for additional stability.
The result: dairy that integrates seamlessly into a fully developed base rather than being cooked alongside raw ingredients for hours.
Layer 6 — Brightness at the End
Rich, slow-cooked dishes almost always benefit from a note of acid and freshness at the very end. A squeeze of lemon, a splash of sherry vinegar, a handful of fresh parsley — these additions cut through richness, lift heavy flavors, and make the dish taste balanced rather than stodgy. Add them off heat, after the dairy is incorporated, immediately before serving.
Best Dairy Substitutes for Long-Cook Applications
Some slow cooker recipes genuinely benefit from dairy substitutes that are intrinsically more stable than fresh dairy. Here are the most effective options:
| Substitute | Stability | Best Application | Flavor Profile |
|---|---|---|---|
| Evaporated milk | High | Soups, chowders, curries | Slightly sweet, concentrated |
| Cream cheese | Very High | Rich soups, cream sauces | Tangy, thick, rich |
| Coconut milk (full-fat) | Very High | Curries, stews, Asian dishes | Sweet, tropical |
| Cashew cream | High | Dairy-free soups and sauces | Neutral, creamy |
| Condensed cream of mushroom soup | High | Classic comfort dishes | Savory, thick, umami |
| Vegan cream cheese | High | Dairy-free applications | Variable by brand |
Cream cheese in particular is an underutilized slow cooker ingredient. Because of its high fat content and the way it melts gradually, it can be added earlier than other dairy options (up to an hour before serving) without breaking. It also adds body and a subtle tang that enhances savory dishes.
Coconut milk, when used in curry or stew applications, behaves like a high-fat cream — it is stable, rich, and contributes a characteristic flavor that works beautifully in Southeast Asian, Indian, and Caribbean recipes.
Practical Protocol: Creamy Slow Cooker Dishes Done Right
To bring everything in this guide together, here is a practical protocol for any creamy slow cooker recipe:
Step 1 — Build the base with intention. Start with aromatic vegetables, fat-bloomed spices, tomato paste (if applicable), and seared protein. Add your stock, wine, or other cooking liquid. Set the slow cooker to Low.
Step 2 — Season conservatively at the start. Add half your intended salt and all dried woody herbs (thyme, rosemary, bay). Hold the acid and delicate dried herbs.
Step 3 — Cook undisturbed. Resist the urge to lift the lid repeatedly. Each time the lid is removed, the cooker loses 20–30 minutes of cooking time.
Step 4 — Add later vegetables at the 2-hour mark. Softer vegetables, pasta, or grains go in with 2 hours remaining.
Step 5 — Stabilize if needed. If using lower-fat dairy, stir a cornstarch slurry into the slow cooker 30 minutes before the end.
Step 6 — Temper and add dairy. With 15–30 minutes remaining, temper your sour cream, yogurt, or cream cheese using the hot liquid method, then stir it in. For heavy cream, add directly but gently, stirring to incorporate. Set heat to Low.
Step 7 — Finish with brightness. Off heat: squeeze of lemon, fresh herbs, final salt adjustment. Serve immediately.
Common Mistakes and How to Fix Them
Mistake: Dairy added at the start. Fix: Transfer the dish to a pot on the stovetop, remove the curdled dairy if possible, and finish with fresh cream or cream cheese added off heat.
Mistake: Boiling after dairy is added. Fix: Turn heat to the lowest setting or Off as soon as dairy goes in. Boiling breaks any emulsion instantly.
Mistake: Cold dairy added directly to very hot liquid. Fix: Always temper. Even with heavy cream, letting it sit at room temperature for 20 minutes before adding reduces the thermal shock.
Mistake: Using low-fat or fat-free dairy. Fix: Switch to full-fat versions. The fat content is not optional for heat-stable results — it’s structural.
Mistake: Adding acid (lemon, tomatoes) with the dairy. Fix: Add acid at the very end, after dairy is fully incorporated and heat is off.
Summary
Dairy separation in the slow cooker is not a mystery — it is chemistry, and chemistry is predictable. Add dairy late, choose high-fat options, temper protein-rich dairy before adding, use starch as a stabilizer when needed, and never boil once dairy is in the pot. Layer your flavors deliberately: aromatics and spices at the start, dairy at the end, brightness at the table. Time your herbs correctly — dried and woody herbs for the long cook, fresh herbs as finishing garnishes only.
Follow these principles consistently, and creamy slow cooker dishes — from pork chop braises to potato soups to butter chicken — will come out silky, stable, and deeply flavorful every time.
Please share this How to prevent dairy separation in slow cooker recipes? with your friends and do a comment below about your feedback.
We will meet you on next article.
Until you can read, Adding spices before or after slow cooking?